
Table of Contents
- Preventative Maintenance for Your AR-15: Avoiding Problems from the Beginning
- Before We Begin: Safety First
- Lead Exposure
- Setting Up Your Workspace for Your AR-15
- The AR-15 Bolt Carrier Group (BCG): The Heart of the Rifle
- The AR-15 Charging Handle: Small Part, Real Consequences
- Cleaning the Chamber and Barrel
- Castle Nut Staking and Torque: Don’t Skip This
- Forced Reset Triggers & Super Safeties
- AR-15 Fire Control Group Maintenance
- Wrapping Up: Final Function Check After Maintenance
Preventative Maintenance for Your AR-15: Avoiding Problems from the Beginning
Let’s go through a few things and just sidestep a few issues entirely:Quality Ammunition
It can be super tempting to always look at the cost per round. When it comes to cheap ammunition, “inconsistency” is the least of your worries. Avoid steel-cased ammunition if at all possible. Low quality ammunition can create cycling issues, run noticeably dirtier, and even run into things like squib loads (where the bullet is lodged into your barrel and doesn’t exit…setting you up for a catastrophic failure if another round is then fired) or jacket separation (where the copper jacket begins to separate as the projectile leaves the barrel…which is a great way to ruin a suppressor). Buy quality ammo.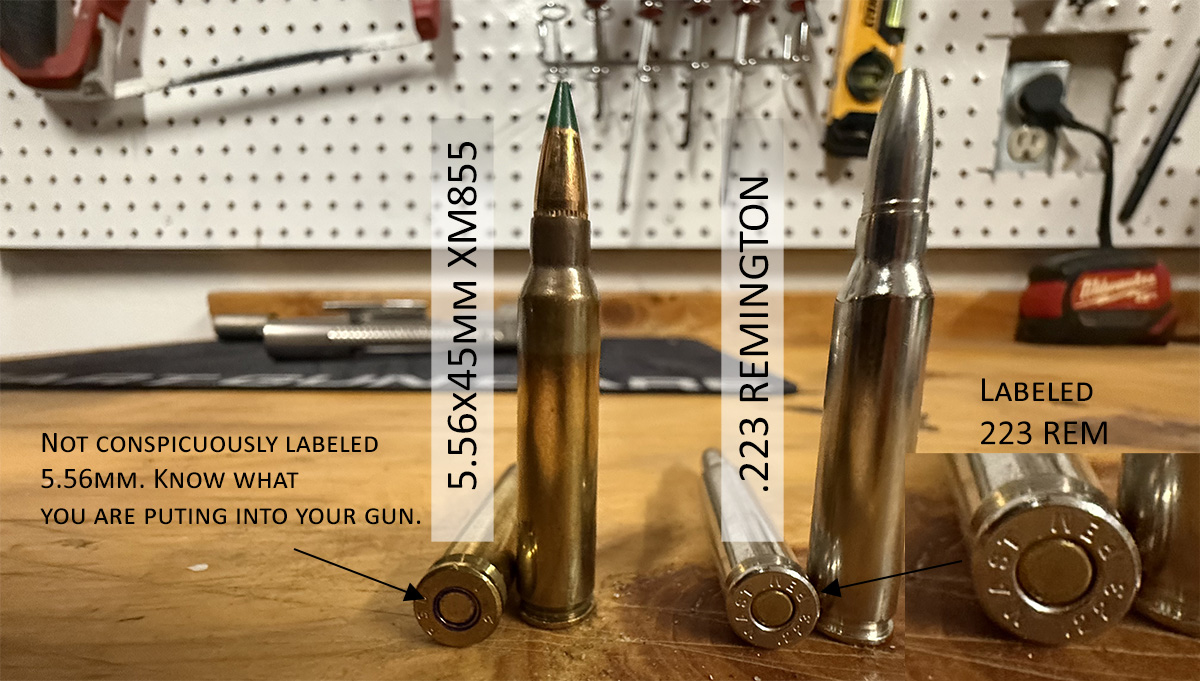
Buy the Correct Ammunition for your AR-15’s (It’s not nuance)
If your barrel is marked 5.56 NATO, it is not the same as .223 Remington—but it can safely fire both. The difference is in the chamber. A 5.56 NATO chamber is designed to handle higher pressure, while a .223 Remington chamber is tighter and built for lower-pressure ammo. Here’s the rule: a 5.56 NATO barrel can shoot 5.56 NATO and .223 Remington. A .223 Wylde barrel can shoot both safely (designed for it). A .223 Remington barrel should only shoot .223 Remington. If you’re on the fence for what to get, just get a 5.56 NATO-chambered barrel.Compartmentalize Calibers: Don’t Create a Preventable Failure
If you run multiple calibers on the AR-15 platform, you need a system. Keep ammunition, magazines, and uppers strictly separated. Don’t mix them. Don’t “just bring everything.” That’s how mistakes happen. This is especially critical with calibers like .300 AAC Blackout and 5.56 NATO. A .300 BLK round can fit into a 5.56 magazine and chamber just enough to create a catastrophic failure if fired. That’s not a malfunction…that’s a destroyed rifle. Have a rule: in terms of the AR-platform, only bring one caliber to the range at a time. If you’re running a .300 BLK setup, there should be zero 5.56 ammo or magazines anywhere in your gear. Same in reverse. Label magazines if you need to. Use different colored mags. Separate storage. Whatever it takes to eliminate overlap.Buy Quality Magazines. Always.
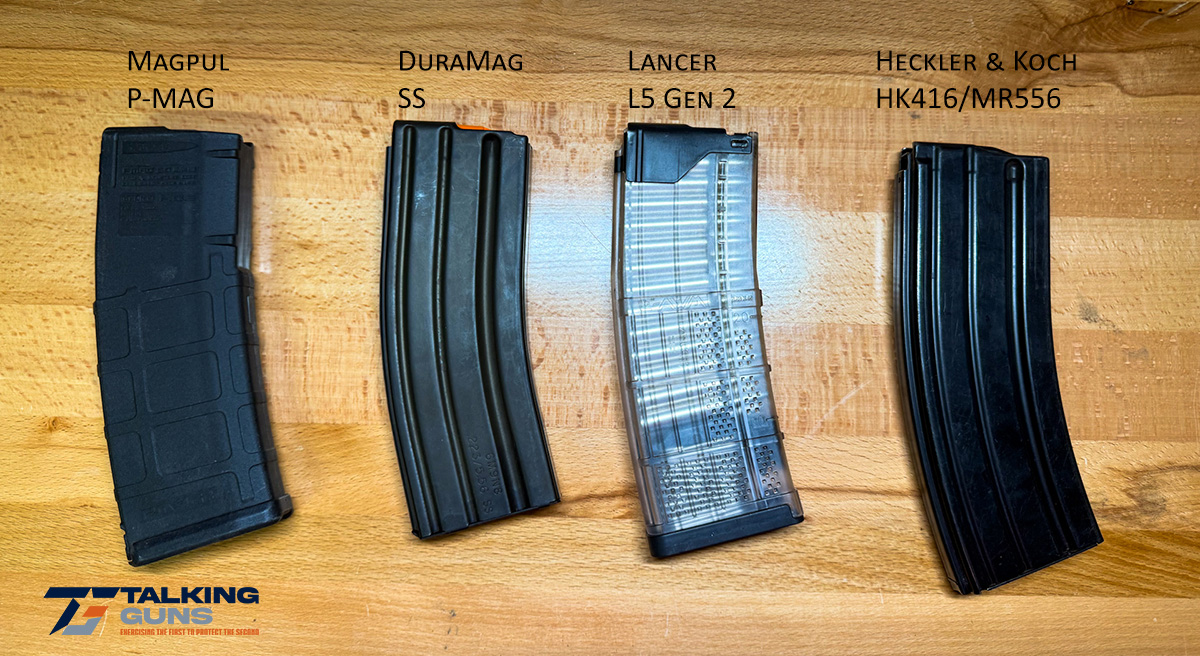
For 5.56mm setups, we recommend:
- Magpul P-MAG (20, 30, or 40 round)
- Lancer L5 Gen 2 AR-15 Mags (20 or 30 round)
- Duramag (Stainless Steel) 30 round magazine
- HK AR-15 30 Round Magazine (Steel)
If you’re running an old school aluminum 30 round magazine, upgrade your mag follower with a Magpul anti-tilt follower for better reliability. For 9mm pistol caliber carbines, Glock OEM 33 round magazines are hard to beat. Drums can be hit or miss for reliability. I’ve had decent luck with the Magpul D-60. If you see some off-brand magazine or a price too good to be true…just don’t. Consider a quality magazine to be an investment in reliability.
In the case that you’re running .300 BLK, consider getting dedicated .300 Blackout magazines. Can 5.56mm mags take .300 Blackout? Yes, but dedicated .300 BLK magazines like this one from Lancer only enhance reliabillty through subtle geometry changes made with the .300 BLK cartridge specifically in mind.
Storage Matters
Moisture leads to corrosion. It doesn’t happen overnight, but it happens. If your rifle lives in a safe, control the environment. A large desiccant pack is cheap insurance against rust forming where you can’t see it.Cases Matter

Transporting to and from the range? A soft case is fine—until it isn’t. Loading up after a range day, people get careless. Gear gets tossed around. That’s how optics get knocked out of zero or damaged. A hard case, like a Pelican Vault V700 Rifle Case, removes that variable. It protects your rifle from impact, pressure, and other people’s lack of awareness. You don’t need it—until you do. Then it pays for itself immediately. While you’re at it, don’t just get the Pelican V700 – ditch the foam it comes with and just go right for the Magpul Daka system. It’s extremely versatile and allows your Pelican V700 (which is a total investment given that it’s TSA-friendly for traveling) to be reconfigured an near-infinite amount of ways.
Witness Marks
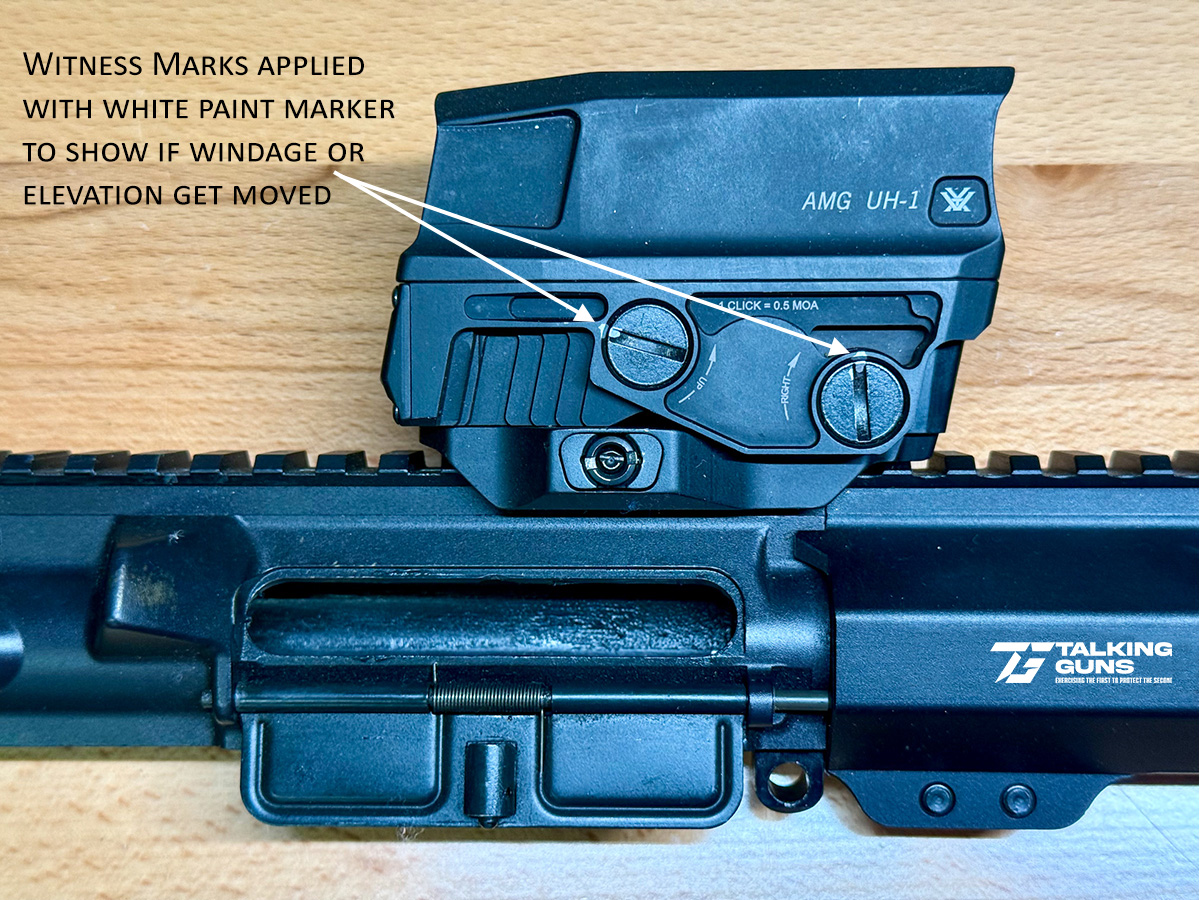 In the course of use, your AR-15 will experience countless cycles of vibration, heating, and cooling. Things rattle loose. Add witness marks to your windage and elevation dials on your optic just in case things get moved accidentally, or walk out of place over time.
Before We Begin: Safety First
Before you do anything—cleaning, adjusting, inspecting—clear the rifle. No shortcuts here.- Drop the magazine.
- Lock the bolt to the rear.
- Visually and physically inspect the chamber. Don’t glance—actually confirm it’s empty.
- Then check it again.
Lead Exposure
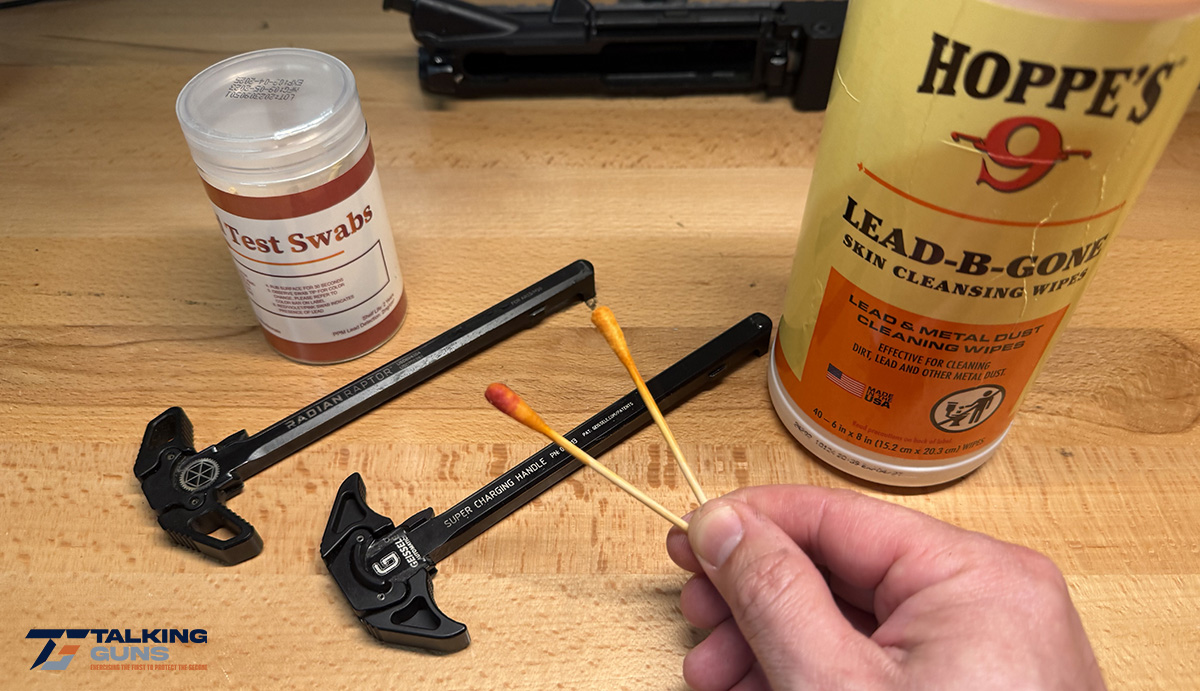 Now that we’re clear, there’s one more thing that’s often overlooked that you should have nearby and ready to use once we’re done: lead wipes. These wipes bind the lead to the towelette to safely remove lead residue from your hands and other work surfaces.
Just because you don’t see exposed lead conspicuously in the form of ammunition, it doesn’t mean lead residue isn’t present. Ever look at your muzzle brake or flash hider on your AR-15? Notice that green residue? That’s copper depositing itself. Lead can also be present. If you’re maintaining firearms, keep lead residue in mind. Wash your hands with cold water and soap when you’re done if you don’t have lead wipes. If you handled ammunition? Wash your hands. Reloading equipment? Wash up. Avoid eating and putting your hands on things like water bottle nozzles until you’ve washed.
If you work on firearms a lot, if you ever want to be more cautious, lead test kits are inexpensive and can tell you if a surface on a firearm has lead exposure. The process is simple – it’s an orange/yellow Q-tip. Dip it in water and rub the surface you want to test for lead. If it turns red, you have lead present. It’s not a bad idea to test your vehicle’s steering wheel, and your door knob every now and again and wipe those surfaces down.
Lead exposure is a silent danger that’s easy to avoid. It’s often not talked about, but a little prudence will add up over a lifetime of involvement with firearms.
Now that we’re clear, there’s one more thing that’s often overlooked that you should have nearby and ready to use once we’re done: lead wipes. These wipes bind the lead to the towelette to safely remove lead residue from your hands and other work surfaces.
Just because you don’t see exposed lead conspicuously in the form of ammunition, it doesn’t mean lead residue isn’t present. Ever look at your muzzle brake or flash hider on your AR-15? Notice that green residue? That’s copper depositing itself. Lead can also be present. If you’re maintaining firearms, keep lead residue in mind. Wash your hands with cold water and soap when you’re done if you don’t have lead wipes. If you handled ammunition? Wash your hands. Reloading equipment? Wash up. Avoid eating and putting your hands on things like water bottle nozzles until you’ve washed.
If you work on firearms a lot, if you ever want to be more cautious, lead test kits are inexpensive and can tell you if a surface on a firearm has lead exposure. The process is simple – it’s an orange/yellow Q-tip. Dip it in water and rub the surface you want to test for lead. If it turns red, you have lead present. It’s not a bad idea to test your vehicle’s steering wheel, and your door knob every now and again and wipe those surfaces down.
Lead exposure is a silent danger that’s easy to avoid. It’s often not talked about, but a little prudence will add up over a lifetime of involvement with firearms.
Setting Up Your Workspace for Your AR-15
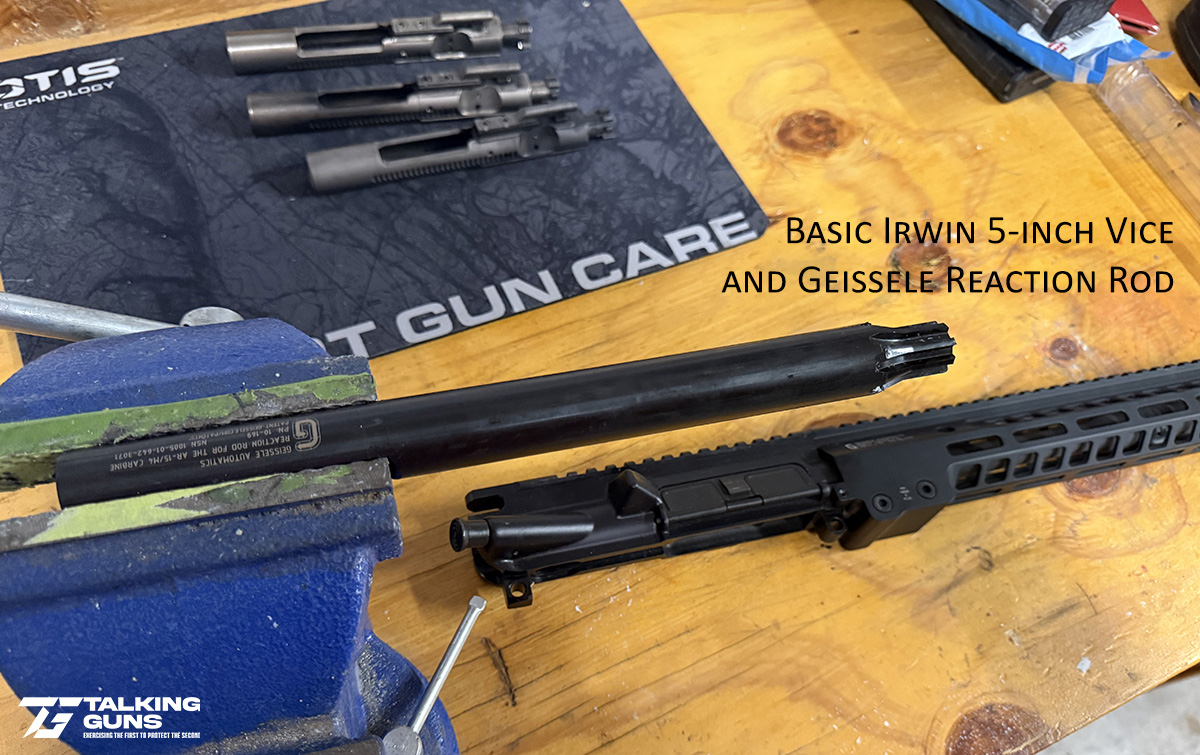 Working on your rifle without proper support is how things get scratched, bent, or misaligned. Set your workspace up correctly once, and everything else becomes easier and more efficient.
Start with a solid bench vise. Real Avid makes one, but you could get a standard one from Home Depot that clamps just fine. That’s your foundation. From there, use the right interface for the job.
A magwell insert or tool like the Real Avid Smart-Fit AR-15 Vice Block or the Magpul BEV Block is the simplest way to secure the rifle when you’re doing general maintenance. It locks into the lower and gives you a stable platform without putting stress on the wrong areas.
If you’re working on just your AR-15’s upper, especially anything involving torque, a Geissele reaction rod is the better tool. Something like the Geissele Reaction Rod engages the barrel extension directly, which keeps force where it belongs and avoids twisting or damaging the receiver.
Clamshell-style upper vise blocks are another option. They can work, but they rely on external clamping pressure around the receiver and you do need to remove your optic when using them.
Working on your rifle without proper support is how things get scratched, bent, or misaligned. Set your workspace up correctly once, and everything else becomes easier and more efficient.
Start with a solid bench vise. Real Avid makes one, but you could get a standard one from Home Depot that clamps just fine. That’s your foundation. From there, use the right interface for the job.
A magwell insert or tool like the Real Avid Smart-Fit AR-15 Vice Block or the Magpul BEV Block is the simplest way to secure the rifle when you’re doing general maintenance. It locks into the lower and gives you a stable platform without putting stress on the wrong areas.
If you’re working on just your AR-15’s upper, especially anything involving torque, a Geissele reaction rod is the better tool. Something like the Geissele Reaction Rod engages the barrel extension directly, which keeps force where it belongs and avoids twisting or damaging the receiver.
Clamshell-style upper vise blocks are another option. They can work, but they rely on external clamping pressure around the receiver and you do need to remove your optic when using them.
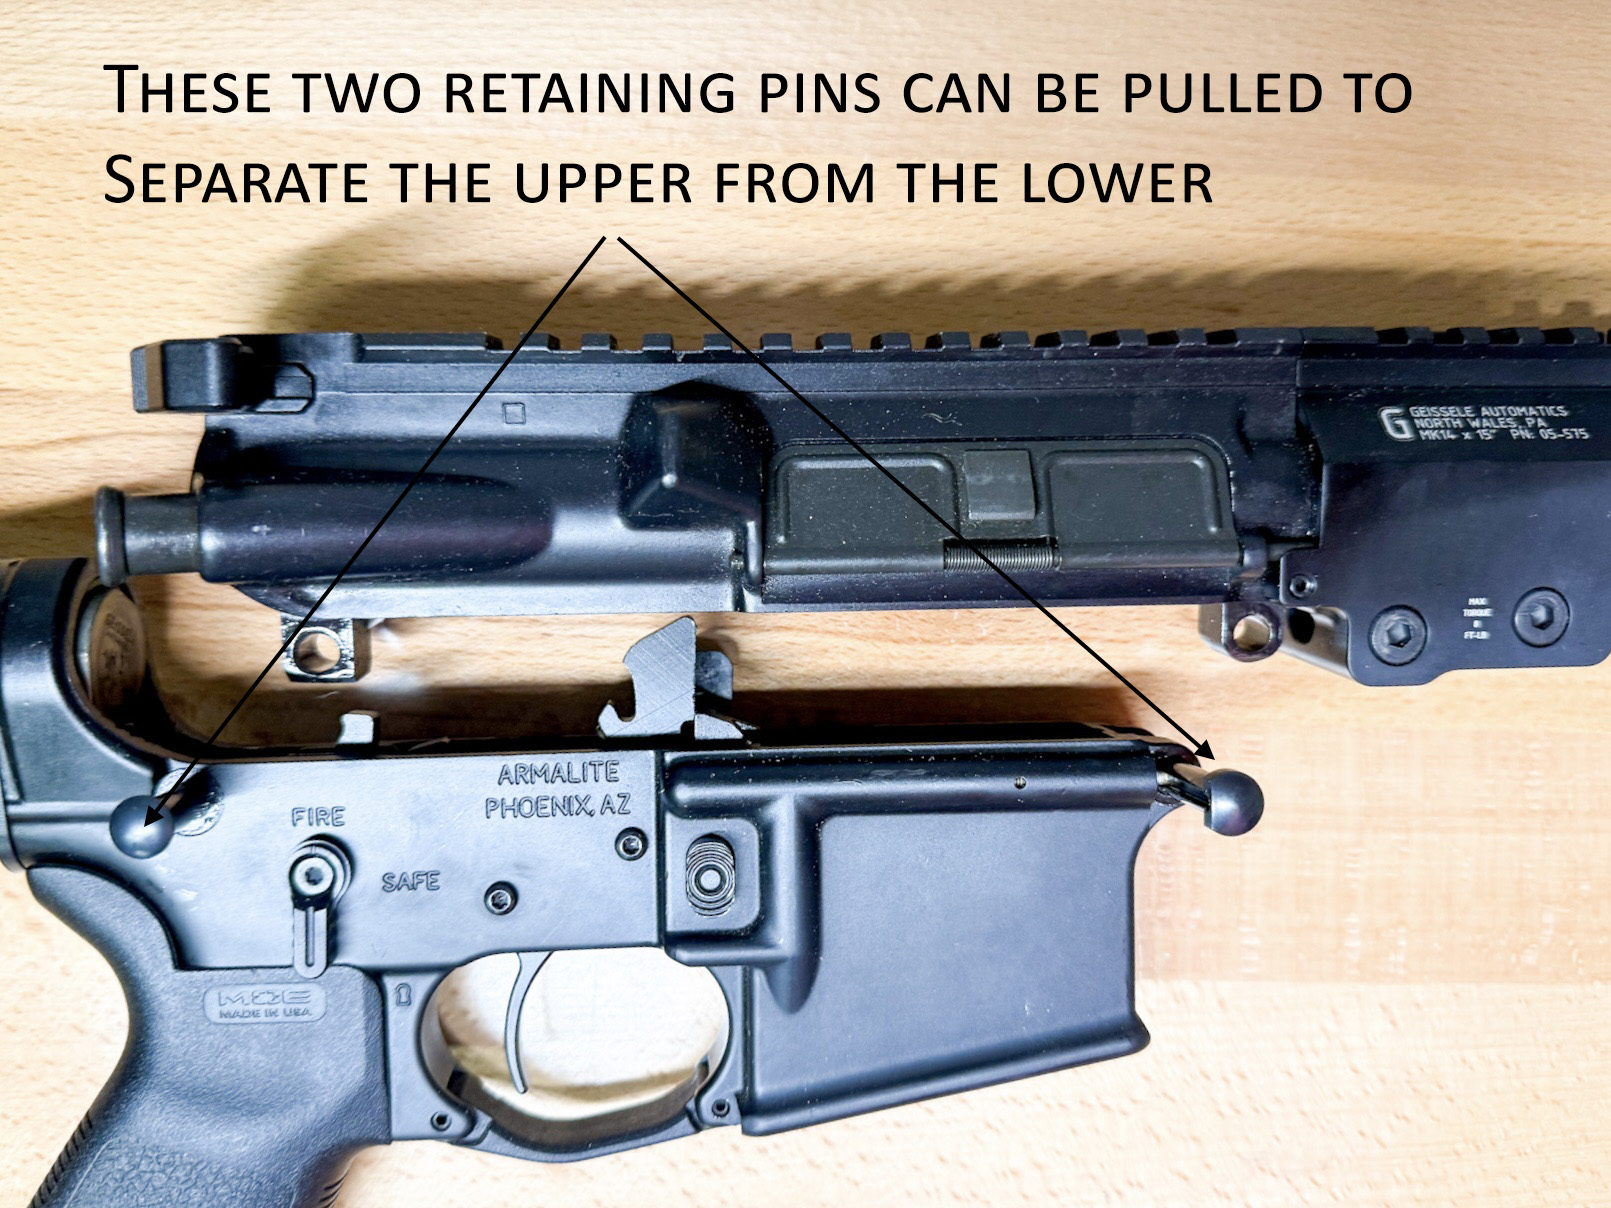
To start things off, your AR-15 can be partially disassebled into two main components (the upper and the lower) by pushing out these two retaining pins.
The AR-15 Bolt Carrier Group (BCG): The Heart of the Rifle
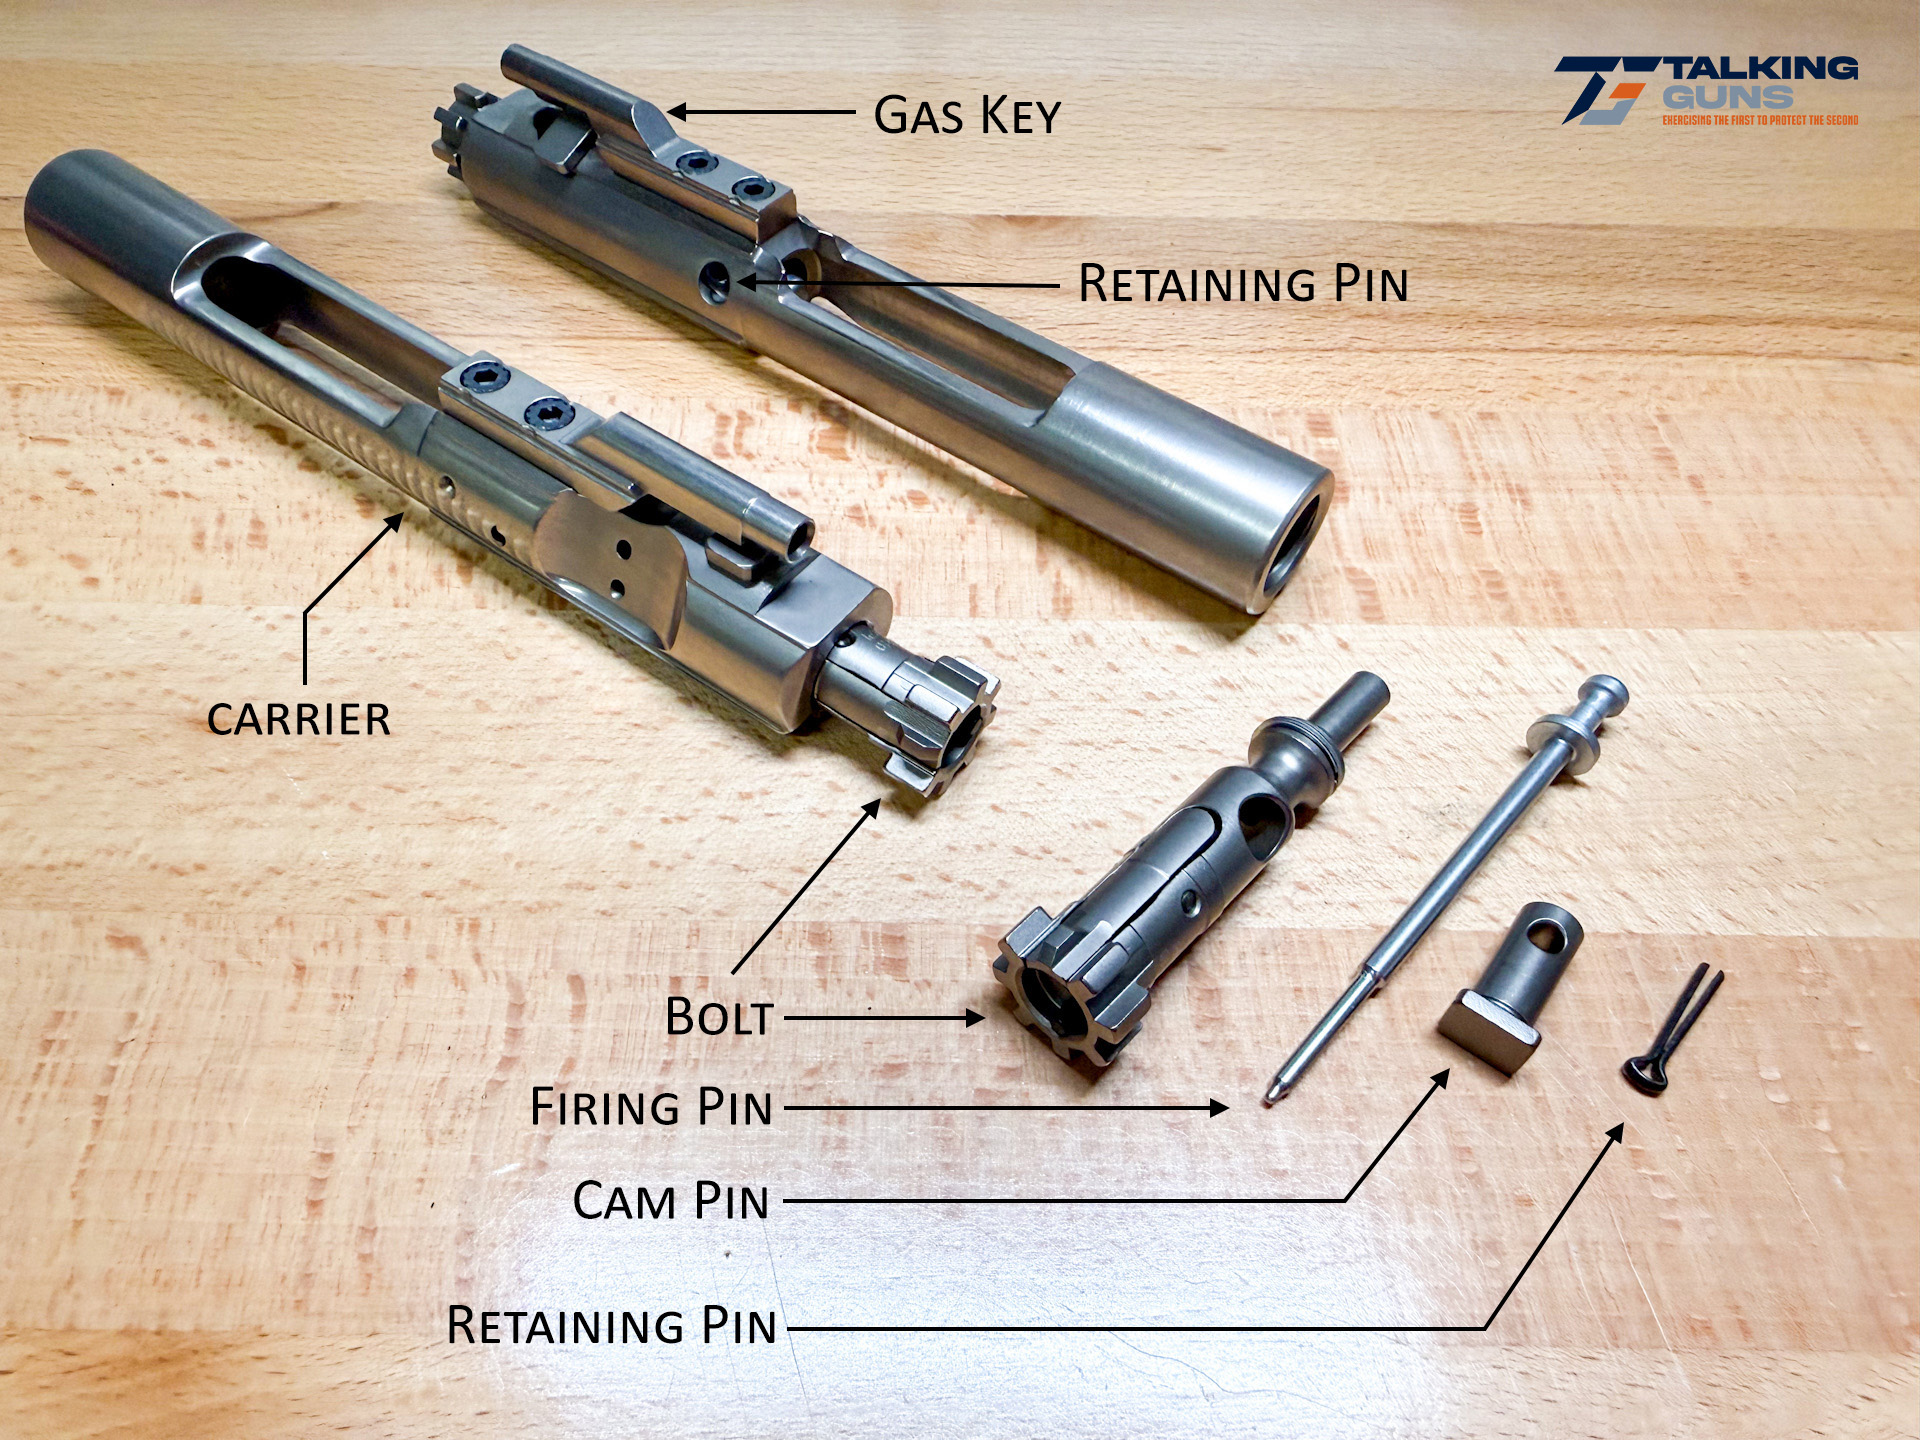 The bolt carrier group drives the entire cycle of the rifle. Begin by disassembling your BCG by:
- Removing your retaining pin on the side of the BCG.
- Then push your bolt back into the carrier.
- From here, pull out your firing pin.
- Then, rotate your cam pin 90 degrees and pull it out.
- Lastly, pull out your bolt and separate it from your carrier
- (and to reassemble, do these steps in reverse)
With things disassembled to this degree, start by spraying it down with a high-quality cleaner like M-Pro 7. Wipe it down and remove all carbon and dirt. If you have access to an ultrasonic cleaner, use it. Lyman makes an ultrasonic cleaner – just be sure to always use fresh distilled water only along with the appropriate cleaning solution (there is a specific formula for brass versus regular gun parts). It makes the process thorough and easy. Once it’s out, dry it completely. Any trapped moisture is working against you. Reassemble your BCG (steps in reverse above).
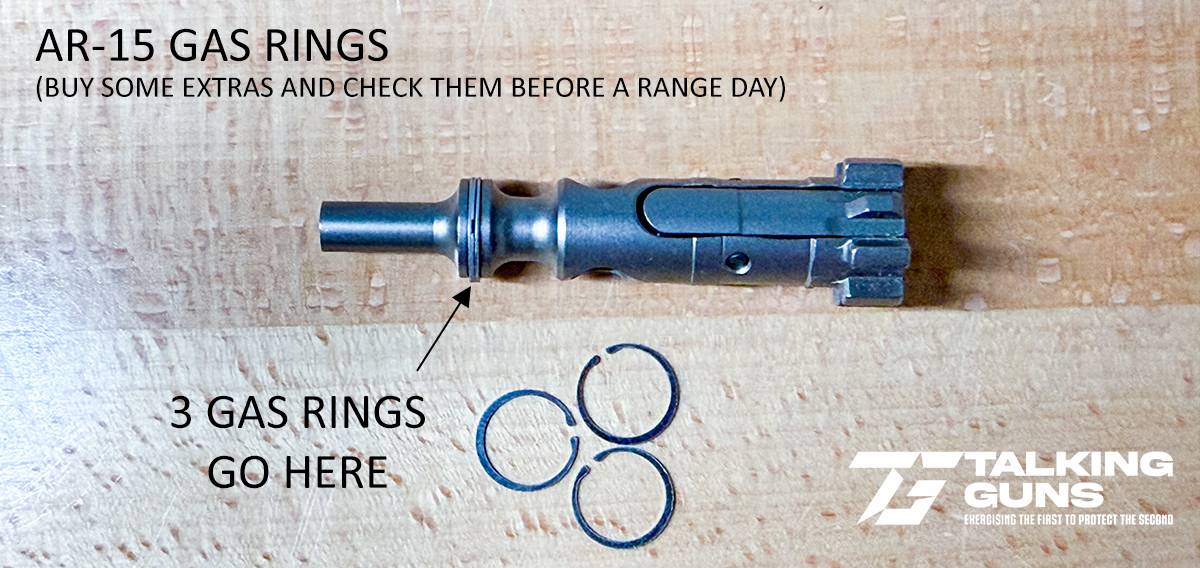
From there, check the gas rings. Extend the bolt fully in your BCG and stand the BCG on the bolt face (carrier faces the ceiling, bolt face is into your workbench surface). If it collapses under its own weight, your gas rings are too worn and need replacement. You’ll hear people throw out round counts for replacement, but that’s not reality.
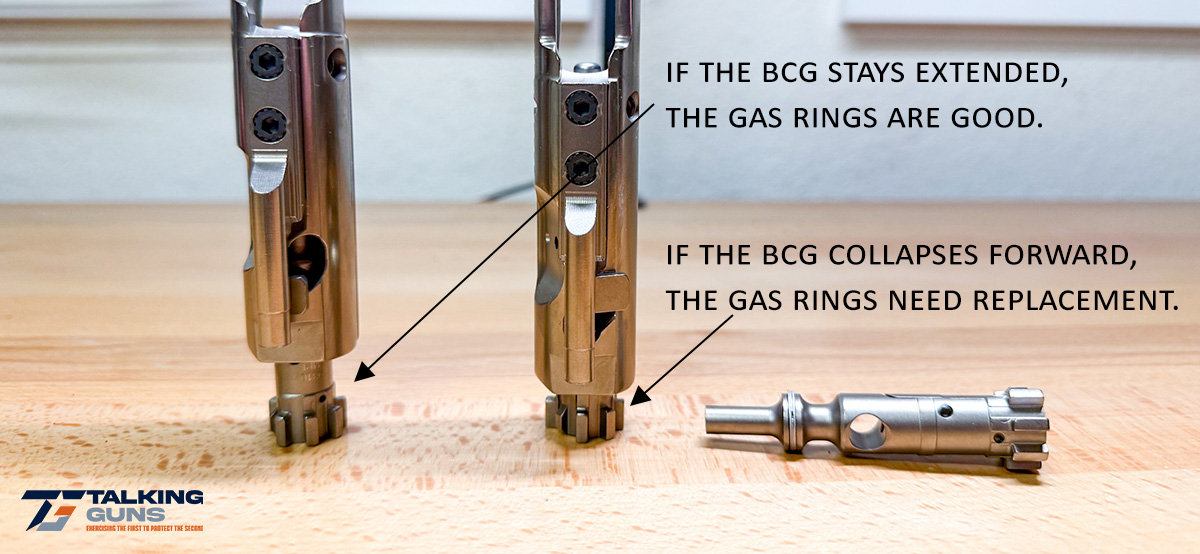
Gas rings don’t fail on a schedule. Sometimes they go early, sometimes they last thousands of rounds. The only thing that matters is whether they’re still doing their job. I’ve had some fail at under 800 rounds, whereas others have lasted thousands and are still going. Next, check the gas key. Try to move it. There should be zero wiggle—none. If there’s any movement at all, that’s a failure point. Don’t try to band-aid it by tightening and restaking.
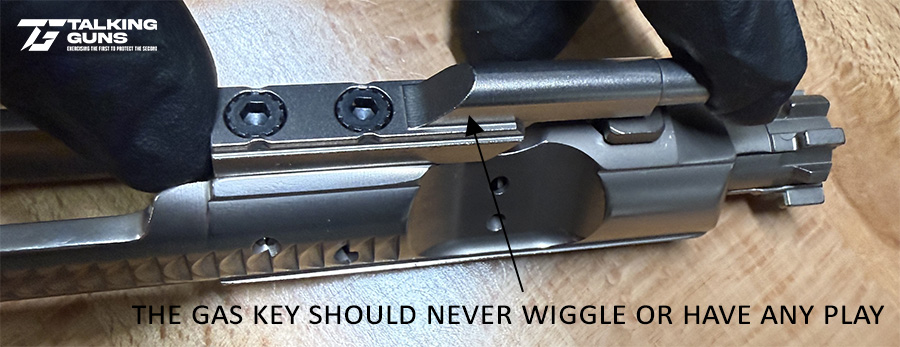
Have it replaced. If a gas key has already been staked, the metal is already fatigued. Re-staking doesn’t make for a good fix. Once everything checks out, lubricate it properly. A controlled application works best -something like a syringe bottle with Lucas Gun Oil lets you apply oil exactly where you need it (I’m specifically linking to the squeeze bottle with the needle tip for putting lubricant precisely where it needs to go without over-lubricating). Focus on the carrier’s outer rails and contact surfaces. You’re not soaking it – you’re giving it enough to reduce friction and keep the system running smoothly.
The AR-15 Charging Handle: Small Part, Real Consequences
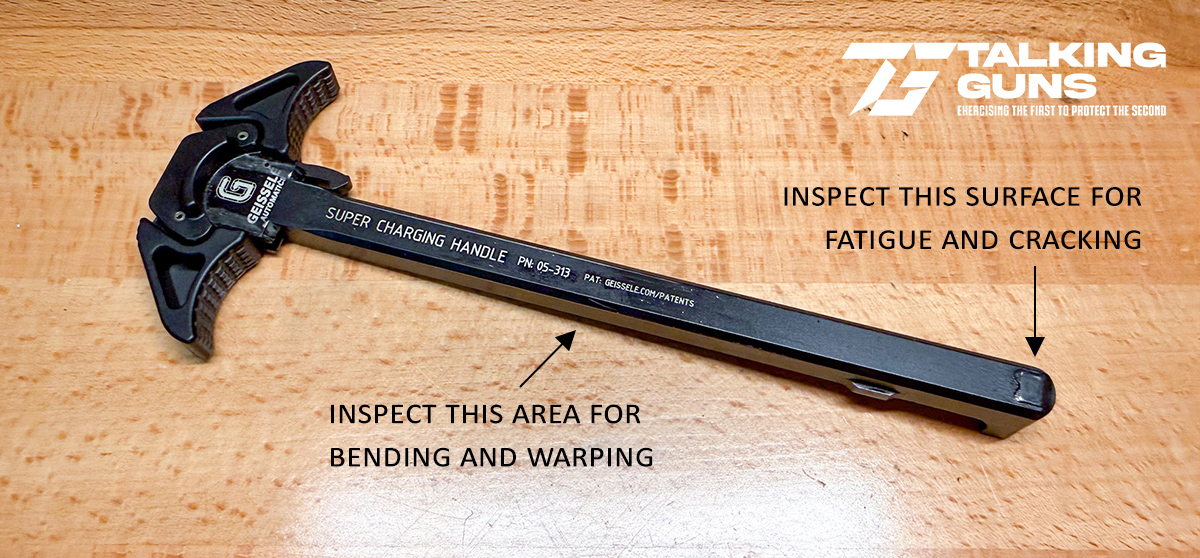
The charging handle doesn’t get much attention, but when it fails or deforms, it can create problems that look like something else entirely. Start with looking for the right material. Go with a charging handle made from 7-series aluminum (7075 aluminum), not 6-series (6061 aluminum). 7-series aluminum is harder, more resistant to wear, and holds up better over time. Anytime you remove it, give it a quick inspection. Look at the area that interfaces with the bolt carrier group. That’s a stress point. If you see peening, deformation, or any signs of cracking, don’t ignore it. That’s an early warning sign. Then, check the long, slender body of the charging handle itself. It should be perfectly straight. Even a slight bend or warp can introduce drag inside the upper receiver, which turns into sluggish cycling or inconsistent operation. These aren’t always obvious at first—they show up as “weird” behavior that’s easy to misdiagnose. This isn’t a high-maintenance part, but it is a critical interface. A quick check takes seconds and can save you from chasing problems that don’t need to exist. Here are a few quality AR-15 charging handles we recommend:
- Geissele Automatics Super Charging Handle (pictured above)
- (If Running Suppressed) Radian Weapons SD Charging Handle
Cleaning the Chamber and Barrel
Invest in a cleaning kit like the this one from M-Pro 7 and follow the instructions below.- Start from the chamber and work forward. That matters. Running debris back into the chamber is how you create problems you didn’t have before.
- Use a proper chamber brush and actually spend time here. The chamber takes the brunt of heat, pressure, and carbon buildup, and it directly affects feeding and extraction. A dirty chamber will cause issues that get blamed on magazines, gas systems, or ammo. Most of the time, it’s just buildup.
- Once the chamber is handled, move into the bore. Run a bore brush through to break up fouling, then follow with patches until they come out reasonably clean.
- If you’re using a solvent, let it do the work. Give it a minute to break things down before pushing patches through. Rushing this step just wastes effort.
- Pay attention to the muzzle end as well. If you’re running a brake or compensator, carbon will build up there fast. It’s not just cosmetic—heavy buildup can start to affect performance over time.
- Regular use of a convenient tool like the Hoppes 5.56mm Bore Snake is a great idea to reduce buildup, but I still recommend going the patch route for a thorough cleaning.
Castle Nut Staking and Torque: Don’t Skip This
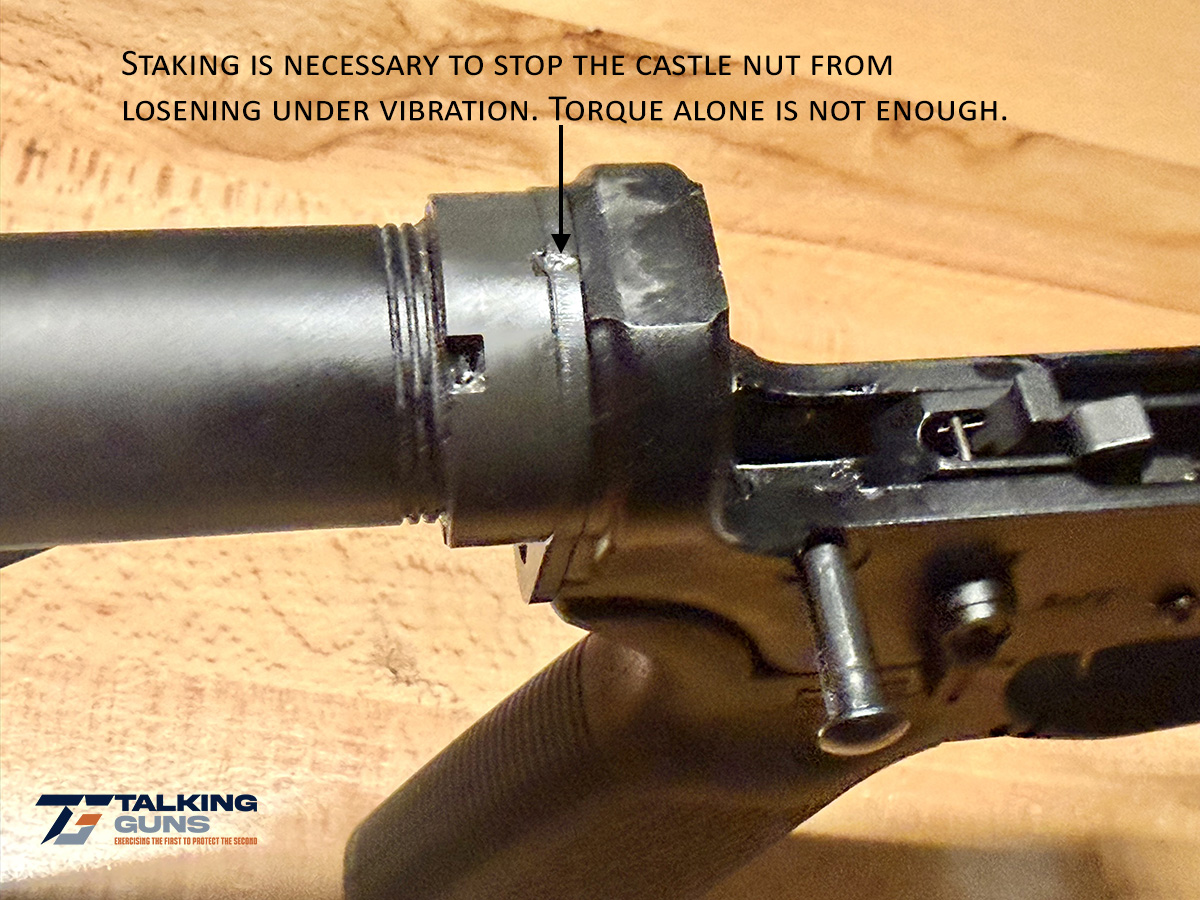 If your rifle is “built, not bought”, so many people neglect to do this. From the factory, castle nuts are staked. The castle nut is what keeps your receiver extension (buffer tube) locked in place. If it loosens, your entire system starts to shift—and that turns into reliability issues fast. Torque it properly first. Then stake it.
Staking means displacing material from the end plate into the castle nut so it physically cannot rotate. This isn’t cosmetic. It’s mechanical retention. A properly staked castle nut does not back off under recoil. If yours isn’t staked, fix it. If it’s lightly marked but not actually displaced into the nut, that’s not real staking. This is one of those “set it once and forget it” things, but only if it’s done correctly. An automatic spring-loaded center punch tool from Home Depot can help stake a castle nut easily.
Forced Reset Triggers & Super Safeties
This is a maintenance guide – yet it’s important to speak to this now that FRT’s and super safeties are among us like never before. They aren’t technically “full auto” but that’s not the point here (and you have a right to both). When you have an accelerated rate of fire, you do put a lot more wear and tear on your rifle. The biggest wear item to keep in mind is your barrel. If you’re running an FRT like a Partisan FRT or a super safety like an Atrius, consider a quality barrel that is cold hammer forged (CHF) and chrome lined. These barrels from the likes of Geissele and FNH USA are made for heavy use. Compared to a nitrided barrel, a CHF barrel will outlast it by thousands of rounds. Are they more expensive? Absolutely. Are they way cheaper than replacing an expensive suppressor? Also yes. Remember, rifling doesn’t give a warning that the next round fired won’t be stabilized. FRT’s will accelerate barrel wear – consider upgrading to a better barrel if you have not done so already.AR-15 Fire Control Group Maintenance
Looking to clear build-up from your lower, specifically in your fire control group area? When your lower is separated from your upper, use brake cleaner and spray it into your trigger mechanism but be sure to mask off any polymer components to protect them. This removes grease and all lubricant as well. Allow all dirt, carbon, etc. to flow out. Let the lower dry and wipe it down with a paper towel. Then add a few drops of Lucas Oil Gun Lubricant to the contacts points of your trigger assembly and reunite your upper with your lower receiver.Wrapping Up: Final Function Check After Maintenance
Once everything is back together, don’t assume it’s good…confirm it. Keeping the muzzle in a safe direction, cycle the action and make sure movement is smooth. Dry fire on an empty chamber, hold the trigger, cycle again, and confirm a clean reset. If something feels off here, pause and reassess.

One Response
I would like to know where and what you purchased for your car15 build. Thanks